L2TP VPN Server on Raspberry Pi

The following are instructions for setting up an L2TP VPN server on a Raspberry Pi running Raspbian Jessie. This allows you to connect your iPhone or other device using L2TP VPN to your home network, to securely access resources on it. This set up uses a Raspberry Pi sitting behind your normal router.

These instructions are based on an older forum post on the Raspberry Pi forums.

All of the following commands will need to be run as root. Use sudo to become the root user.

$ sudo su -

Configuring a Static IP Address

Since your Raspberry Pi is running a server, it will be important to give it a consistent IP address so that we can forward the necessary ports to it. The IP address you choose depends on your local network setup. My network uses the 192.168.1.XXX range, so I have decided to use 192.168.1.16 for my Raspberry Pi. Here are the full settings for my setup:

IP Address: 192.168.1.16

Netmask: 255.255.255.0

Gateway: 192.168.1.254

DNS Server(s): 192.168.1.254

With the release of Raspbian Jessie, the method for configuring IP addresses has changed. Raspbian now uses dhcpcd as the default, so it is no longer recommended that you directly modify /etc/network/interfaces. Instead, we will modify dhcpcd’s configuration.

Edit /etc/dhcpcd.conf and add the following to the end. You will need to modify some of these values based on your setup.

interface eth0
static ip_address=192.168.1.16/24
static routers=192.168.1.254
static domain_name_servers=192.168.1.254

Once you reboot, your Raspberry Pi should now be using the address you have specified.

Installing xl2tpd and openswan

We need to install xl2tpd for our VPN tunnel and openswan for our IPSec security.

Warning: openswan is no longer maintained and has been replaced by strongswan. I have not yet tried this with strongswan.

$ apt-get update
$ apt-get install openswan xl2tpd ppp lsof

Configuring xl2tpd

xl2tpd provides our VPN tunnel into our network.

Replace the contents of /etc/xl2tpd/xl2tpd.conf with the following. You may need to make changes based on your network settings and your static IP address we configured previously.

[global]
ipsec saref = yes
listen-addr = 192.168.1.16

[lns default]
ip range = 192.168.1.201-192.168.1.250
local ip = 192.168.1.16
assign ip = yes
require chap = yes
refuse pap = yes
require authentication = yes
name = linkVPN
ppp debug = yes
pppoptfile = /etc/ppp/options.xl2tpd
length bit = yes

Replace your /etc/ppp/options.xl2tpd with the following:

ipcp-accept-local
ipcp-accept-remote
ms-dns 192.168.1.254
asyncmap 0
auth
crtscts
lock
idle 1800
mtu 1200
mru 1200
modem
debug
name l2tpd
proxyarp
lcp-echo-interval 30
lcp-echo-failure 4
nodefaultroute
connect-delay 5000

Configuring IPSec

IPSec is the encryption layer for your VPN tunnel. We are using the openswan implementation.

Replace your /etc/ipsec.conf with the following. Again, you will need to replace any values depending on your network setup.

# /etc/ipsec.conf - Openswan IPsec configuration file

# This file:  /usr/share/doc/openswan/ipsec.conf-sample
#
# Manual:     ipsec.conf.5


version    2.0    # conforms to second version of ipsec.conf specification

# basic configuration
config setup
    # Do not set debug options to debug configuration issues!
    # plutodebug / klipsdebug = "all", "none" or a combation from below:
    # "raw crypt parsing emitting control klips pfkey natt x509 dpd private"
    # eg:
    # plutodebug="control parsing"
    # Again: only enable plutodebug or klipsdebug when asked by a developer
    #
    # enable to get logs per-peer
    # plutoopts="--perpeerlog"
    #
    # Enable core dumps (might require system changes, like ulimit -C)
    # This is required for abrtd to work properly
    # Note: incorrect SElinux policies might prevent pluto writing the core
    dumpdir=/var/run/pluto/
    #
    # NAT-TRAVERSAL support, see README.NAT-Traversal
    nat_traversal=yes
    # exclude networks used on server side by adding %v4:!a.b.c.0/24
    # It seems that T-Mobile in the US and Rogers/Fido in Canada are
    # using 25/8 as "private" address space on their 3G network.
    # This range has not been announced via BGP (at least upto 2010-12-21)
    #virtual_private=%v4:10.0.0.0/8,%v4:192.168.0.0/16,%v4:172.16.0.0/12,%v4:25.0.0.0/8,%v6:fd00::/8,%v6:fe80::/10:
    virtual_private=%v4:192.168.0.0/16,%v4:10.10.0.0/16,%v4:172.16.0.0/12,%v4:25.0.0.0/8,%v4:!10.25.0.0/16
    # OE is now off by default. Uncomment and change to on, to enable.
    oe=off
    # which IPsec stack to use. auto will try netkey, then klips then mast
    protostack=netkey
    # Use this to log to a file, or disable logging on embedded systems (like openwrt)
    #plutostderrlog=/dev/null

# Add connections here

# sample VPN connection
# for more examples, see /etc/ipsec.d/examples/
#conn sample
#        # Left security gateway, subnet behind it, nexthop toward right.
#        left=10.0.0.1
#        leftsubnet=172.16.0.0/24
#        leftnexthop=10.22.33.44
#        # Right security gateway, subnet behind it, nexthop toward left.
#        right=10.12.12.1
#        rightsubnet=192.168.0.0/24
#        rightnexthop=10.101.102.103
#        # To authorize this connection, but not actually start it, 
#        # at startup, uncomment this.
#        #auto=add

conn L2TP-PSK-NAT
    # !mwd - disabling this fixed stuff
    #rightsubnet=vhost:%priv
    also=L2TP-PSK-noNAT

conn L2TP-PSK-noNAT
        authby=secret
        pfs=no
        auto=add
        keyingtries=3
        # we cannot rekey for %any, let client rekey
        rekey=no
        # Apple iOS doesn't send delete notify so we need dead peer detection
        # to detect vanishing clients
        dpddelay=30
        dpdtimeout=120
        dpdaction=clear
        # Set ikelifetime and keylife to same defaults windows has
        ikelifetime=8h
        keylife=1h
        # l2tp-over-ipsec is transport mode
        type=transport
        #
        left=192.168.1.16
        #
        # For updated Windows 2000/XP clients,
        # to support old clients as well, use leftprotoport=17/%any
        leftprotoport=17/1701
        #
        # The remote user.
        #
        right=%any
        # Using the magic port of "%any" means "any one single port". This is
        # a work around required for Apple OSX clients that use a randomly
        # high port.
        rightprotoport=17/%any
        #force all to be nat'ed. because of ios
        forceencaps=yes

# Normally, KLIPS drops all plaintext traffic from IP's it has a crypted
# connection with. With L2TP clients behind NAT, that's not really what
# you want. The connection below allows both l2tp/ipsec and plaintext
# connections from behind the same NAT router.
# The l2tpd use a leftprotoport, so they are more specific and will be used
# first. Then, packets for the host on different ports and protocols (eg ssh)
# will match this passthrough conn.
conn passthrough-for-non-l2tp
        type=passthrough
        left=192.168.1.16
        leftnexthop=192.168.1.254
        right=0.0.0.0
        rightsubnet=0.0.0.0/0
        auto=route

Configuring your Secret Key

The secret key is a shared key that all of your users will use. Edit /etc/ipsec.secrets

# This file holds shared secrets or RSA private keys for inter-Pluto
# authentication.  See ipsec_pluto(8) manpage, and HTML documentation.

# RSA private key for this host, authenticating it to any other host
# which knows the public part.  Suitable public keys, for ipsec.conf, DNS,
# or configuration of other implementations, can be extracted conveniently
# with "ipsec showhostkey".

# this file is managed with debconf and will contain the automatically created RSA keys
#include /var/lib/openswan/ipsec.secrets.inc

192.168.1.16  %any:   PSK "MYSECRET"

Configuring your Users

You can create as many vpn users as you want. These users are separate from any linux user accounts on your Raspberry Pi. Edit /etc/ppp/chap-secrets

# Secrets for authentication using CHAP
# client    server    secret            IP addresses
username    *    password    *

Modifying iptables and System Services

We need to make some changes to the routing table and system configuration. First we will set some values and add them to our /etc/sysctl.conf which will be loaded each time the system starts up:

$ echo "net.ipv4.ip_forward = 1" |  tee -a /etc/sysctl.conf
$ echo "net.ipv4.conf.all.accept_redirects = 0" |  tee -a /etc/sysctl.conf
$ echo "net.ipv4.conf.all.send_redirects = 0" |  tee -a /etc/sysctl.conf

$ sysctl -p

The iptables and /proc settings won’t survive a reboot. We’ll add these commands to the end of our /etc/rc.local to make sure they are executed on start up:

for vpn in /proc/sys/net/ipv4/conf/*; do echo 0 > $vpn/accept_redirects; echo 0 > $vpn/send_redirects; done
iptables --table nat --append POSTROUTING --jump MASQUERADE

Finally, let’s make sure our xl2tpd and ipsec services will be started on boot:

$ update-rc.d -f ipsec remove
$ update-rc.d ipsec defaults

At this point, you should restart your Raspberry Pi to make sure all settings have taken effect and is configured correctly.

Configuring your Router Port Forwarding

This section depends on your router. Most consumer routers/wifi have a web admin interface at either 192.168.1.1 or 192.168.1.254. Once you are logged in, you’ll need to find the port forwarding or NAT/Gaming section. You will need to have the following ports forwarded to your Raspberry Pi IP Address, which in my case is 192.168.1.16. Please be aware that these ports are UDP not TCP.

Port 4500 UDP

Port 500 UDP

Connecting an iPhone

On your iPhone, go to Setting > General > VPN

Choose “Add VPN Configuration”. Select “L2TP” as the Type.

Type: L2TP

Description: Home VPN

Server: Your public IP address (this is NOT your 192.168.1.16 address. You can get this from your router or from http://whatismyip.com)

Account: The username you configured in /etc/ppp/chap-secrets

RSA SecureID: Disabled

Password: The password you configured in /etc/ppp/chap-secrets

Secret: The Shared secret you configured in /etc/ipsec.secrets

Send All Traffic: If enabled, then ALL your internet traffic will be routed through your home network. If you disable this, then normal internet traffic won’t go through your home network. The VPN will only be used to access devices on your home network

Backporting changes with git

Git is an incredibly powerful tool, but often times very obtuse. There are many different types of work flows you can use with git, but one that I use often is having a master branch where all new development happens, and having a maintenance branch, where certain fixes get backported for a new stable release. I have found that if you don’t do things in a certain way, backporting changes can be a very tedious task.

For my work flow, anytime new work is going to begin on a feature or a bug, it is always done in a new feature branch created from master. In my work flow, that branch is always tied to a ticket (that could be a github issue or a jira ticket) that explains the details of the fix. Each branch fixes or adds one and only one thing. Doing this will make backporting specific fixes or features so much easier. Once this feature branch is completed, it is then merged into master. I ALWAYS merge using the –no-commit and –no-ff options. This is for several reasons:

$ git merge --no-commit --no-ff issue-23
  • I always want a single commit that represents the merge of the entire branch. When backporting, I will be able to specifying this single commit and it will bring in all the associated commits with it
  • It keeps my top level git log clean. Running git log –first-parent will only show my merge commits, not every single commit that was ever made.
  • It gives me a chance to update the ChangeLog appropriately and to write a standard commit message, like “Merged Issue 23 – Added new feature blah”

Let’s look at an example. At some point, I decided master was ready for a 1.0.0 release. I tagged this version, and then created a new maintenance branch from master called 1.0.x

$ git checkout -b 1.0.x master

Development will continue on in the master branch, but any critical bug fixes will get back ported from master into the 1.0.x branch, where I will then make new stable releases of 1.0.1, 1.0.2, …

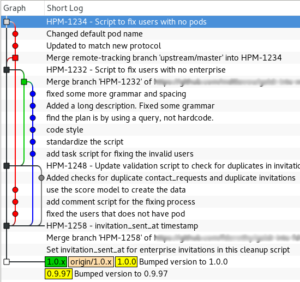
If we take a look at the following log of master, you will see there have been several top level commits into master merging in various feature branches. Each of the commits has lots of subcommits that made up that feature branch.

Master commit log
Master commit log

If we look at the following, the very bottom commit shows where master and the 1.0.x branch diverged. Looking at master, we can see we have 4 merge commits. Each of these branches that were merged in contain subcommits:

  • HPM-1258 – invitation_sent_at timestamp
  • HPM-1248 – Update validation script to check for duplicates in invitations and contact_requests
  • HPM-1232 – Script to fix users with no enterprise
  • HPM-1234 – Script to fix users with no pods

Let’s say that HPM-1234 is the change that we want to merge in. This should bring in every single commit along the red line. This would be very tedious if we had to backport all six individual commits in that branch. That is why we merged in this branch into master using the –no-ff –no-commit options, so we could guarantee to create a single merge commit representing all of them.

Normally, in git, if we wanted to merge in HPM-1234, we would do a git merge 04145ec where 04145ec is the sha1 change. But in git, this will merge every change up to and including HPM-1234. So this will also merge in HPM-1232, HPM-1248, and HPM-1258, which is not what we want!

Git does have a special command for just picking out a single change: cherry-pick. Cherry picking allows us to just pull out a specific commit and merge it into a separate branch. Unfortunately, cherry-pick doesn’t handle scenarios well where a subcommit is a merge. If you look in our example, we can see along our red graph, where master was merged back into our branch. This is going to confuse the cherry-pick command. For the cherry-pick command to work, we will have to manually specific every single commit in the red branch one at a time, instead of just being able to specify the merge commit. And we will either have to skip over the merge commit, or handle it specially using the -m option (depending on what was merged in)

Instead of cherry-pick, we can instead generate a series of patches, then reapply them.  We will do this through the use of two commands: format-patch and am.

There is an issue with doing this. Git loses some of the history, so the relationship of this merge between master and the 1.0.x branch is lost. However, for our case of backporting, this is acceptable.

Each one of the commits in the red graph will come into our maintenance branch as a separate commit. This is not exactly what we want, I would rather have a single top level merge commit in my 1.0.x. Therefore, I will create a new staging branch from the 1.0.x, backport the changes, then merge the staging branch into my 1.0.x branch. Here are the steps:

# create a new staging branch from
# the 1.0.x branch
$ git checkout -b backport-hpm-1234 1.0.x
#
# We will now run format-patch then pipe
# the output directly into am. This will
# create the patches and apply them in a
# single step. We will tell git to just
# use our top level commit
$ git format-patch -n --stdout 04145ec^..04145ec | git am
Applying: fixed the users that does not have a pod
Applying: ...
...

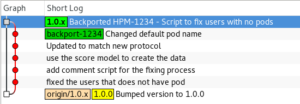
Now we our staging branch looks like the following:

Staging branch with HPM-1234 changes merged in

Now we can go back to our maintenance 1.0.x branch, and merge in our staging branch using the –no-commit and –no-ff options so that we can create a custom merge commit:

$ git checkout 1.0.x
$ git merge --no-commit --no-ff backport-hpm-1234
#
# We can update our ChangeLog or do anything else,
#  then commit
$ git commit -m "Backported HPM-1234 - Script to fix users with no pods"

Our 1.0.x tree now looks like:

1.0.x tree with HPM-1234 backported in

You can see we now have a single top level commit in our 1.0.x branch representing the HPM-1234 branch that was backported in.

Bus Wayfinding Maps

As an update to a project I was working on last year, I have been updating and redesigning some wayfinding signs. These signs are created to fulfill several purposes:

(1) Provide awareness about the bus system, (2) give bus riders and potential bus riders easy information about their options at their current location, (3) and to provide pedestrians with orientation and landmark information

Since each wayfinding sign is specific to its location, I have been choosing sites that specifically have a lot of pedestrian access and potential choice bus riders. So far I have created wayfinding signs for areas in Highland Park for the route #12 and #44, and also in Avondale for the #17. Here’s an example:

Route 44 in Highland Park
« of 3 »


I have been using all open source software to create these. All the routes and maps have been created using QGIS. Inkscape is used for creating vector designs, and Scribus for the final page layout and designs.

I have included all source material in the following downloads. If you would like to add additional locations our new routes, I would welcome any contributions.

If you would like to help hang signs on bus stops, Birmingham has over 3,000. I have found that laminating the signs keeps them protected from weather and that they can easily be hung with simple mounting brackets and industrial zip ties.

Downloads

Route 12

Route 17

Route 44


Global Urban Datafest Hackathon

Last week, myself, Code for Birmingham, and a lot of other talented people came out for the weekend long Global Urban Datafest Hackathon. My team, the Red Mountain COALBOL Miners, worked on a project for the city of Birmingham to help convert their old proprietary datasets into modern formats that they can put in their data warehouse. This is the first big step in getting more open data available for Birmingham.

What was really great about this experience, was every challenge came from a government or city official, so we were solving actual needs and forming great relationships with our city leaders. All five teams did an excellent job, and I hope work continues on all the projects.

My team along with a project working with the Land Bank Authority both won the competition and will be moving on to the nationals. AL.com was one of the sponsors and has done some cool write ups of the weekend:

https://storify.com/AnaMariaCarrano/alabama-smart-cities-hackathon

http://www.al.com/news/birmingham/index.ssf/2015/02/four_teams_compete_to_find_way.html

http://www.al.com/news/birmingham/index.ssf/2015/02/teams_advance_to_global_urban.html

You can find the code our team worked on at our github page.

BJCTA Transit Maps

Code For Birmingham has been working towards making transit it Birmingham, AL more accessible. Part of this has been a push on how we can make transit easier for first time riders. A lot of our focus is centered around using technology, from real time tracking to buying bus passes directly on your phone. But we need to not forget the most basic thing every rider looks at: timetables and maps!


Several graphic designers along with GIS experts from Code For Birmingham, have been coming of with some mock-ups of both new maps and new timetable fliers.

This is the existing timetable for the #1 route to Bessemer. I have found this to be cluttered and difficult to read.

1-SO-Bessemer-1

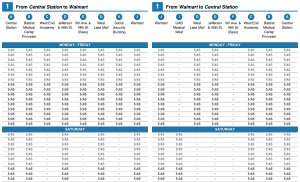
Below is our version of the #1 timetable. The data is the same (this is a mock-up so times weren’t filled in), but we’ve tried to make it easier to read. The locations are clearer and show up directly on the map, as you’ll see below. Instead of using words like Inbound and Outgoing, we are more focused on the starting points and destinations.

route1-timetable

And this is the existing map for the #1 route to Bessemer. Even as someone who is very familiar with this area, I find this map very difficult to read. It is missing all points of reference, distances aren’t accurate, and it isn’t clear that North is not pointing up.

1-SO-Bessemer-2

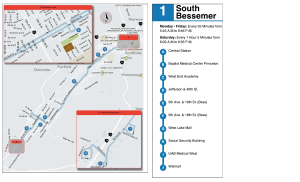
This is our version of the map. We’ve overlayed the route directly on top of a street map, so areas of the city are much more clear. We also have insets to highlight the important detailed areas, like downtown Birmingham and downtown Bessemer. Location points are clearly labeled and correspond with the time points in the time table. We also have the large “subway style” stop map on the right, with times when the bus runs, frequency, and key stops, so that a user can quickly glance at it and have a basic understanding of the bus route.

route1-map

These time tables and maps above are meant to be fliers given out about the route. But Birmingham is finally in the process of removing a city ordinance that banned any information from being displayed at bus stops (I know crazy, right?). With this ordinance being removed, the BJCTA will finally be able to post route maps and information at stops and shelters. With this in mind, Code for Birmingham starting looking at what information would be useful.


While in Paris earlier this year, I noticed the maps they had at their bus stops. An example of the 69 line is shown below.

photo

I found these maps very useful. I tend to be someone who walks in random directions in a city, so I often find myself slightly lost. So when I came to a bus stop that had this map, I was immediately able to tell where I was in the city, what my orientation was, what was nearby, and most importantly, what transit options I had at this location. I was without data on my phone, so it was interesting to get around by bus without having a smart phone to immediately look routes up or get real time trip planning. If I didn’t plan out a route before I left, I would have been pretty lost. But I found I was able to look at any one of these maps and immediately understand the route and availability.


So based on this, I have recreated a short route in Birmingham, the #12. I am not a graphic designer, so I know this could use a lot of work, but I want to just focus on the concept for a minute.

Route12_StopsMap

I am hoping we will be able to create versions of this for every route, at every stop. Not only will this be useful for existing riders, but I think pedestrians will use them for wayfinding. It will help advertise and market the system, and hopefully, a potential bus rider will see how easy the system is, and use public transit.

BJCTA Trip Planner now in sync with official data

My trip planner for the BJCTA Max buses (http://www.bjctatripplanner.org) along with my android app, are now in sync with the official data from the BJCTA. I will continue to keep my site in sync with their data, which means up to date and accurate data!

The app was not found in the store. 🙁

Weld Article On The BJCTA Bus System

Weld recently did a two part series on the status of the BJCTA Bus System. My trip planner was featured in the second part. You can read it online from the links below:

Part 1
Part 1

Part 2
Part 2

Part 1 is a very interesting look at the decline of the bus system since the 1950s and the turmoil and political games around transit in Birmingham. Part 2 takes a look at what is being done now to improve the system along with stories from riders who rely on the system.

Sightings of My App

Last night I was waiting on a bus in 5 points after some drinks with friends. Among the 12 of us who were waiting on a bus, I noticed two young girls, who we clearly not from Birmingham, looking at their phones to figure out what bus to ride to get back to their hotel near the convention center. As I looked over their shoulder, I saw they were using my App! That right there was enough to make me realize that all the work I’ve been doing for the last 1.5 years has been worth it! So, if you haven’t already, give the buses a try and use my app to help you.


BJCTA Bus Trip Planner

The app was not found in the store. 🙁