L2TP VPN Server on Raspberry Pi

The following are instructions for setting up an L2TP VPN server on a Raspberry Pi running Raspbian Jessie. This allows you to connect your iPhone or other device using L2TP VPN to your home network, to securely access resources on it. This set up uses a Raspberry Pi sitting behind your normal router.

These instructions are based on an older forum post on the Raspberry Pi forums.

All of the following commands will need to be run as root. Use sudo to become the root user.

$ sudo su -

Configuring a Static IP Address

Since your Raspberry Pi is running a server, it will be important to give it a consistent IP address so that we can forward the necessary ports to it. The IP address you choose depends on your local network setup. My network uses the 192.168.1.XXX range, so I have decided to use 192.168.1.16 for my Raspberry Pi. Here are the full settings for my setup:

IP Address: 192.168.1.16

Netmask: 255.255.255.0

Gateway: 192.168.1.254

DNS Server(s): 192.168.1.254

With the release of Raspbian Jessie, the method for configuring IP addresses has changed. Raspbian now uses dhcpcd as the default, so it is no longer recommended that you directly modify /etc/network/interfaces. Instead, we will modify dhcpcd’s configuration.

Edit /etc/dhcpcd.conf and add the following to the end. You will need to modify some of these values based on your setup.

interface eth0
static ip_address=192.168.1.16/24
static routers=192.168.1.254
static domain_name_servers=192.168.1.254

Once you reboot, your Raspberry Pi should now be using the address you have specified.

Installing xl2tpd and openswan

We need to install xl2tpd for our VPN tunnel and openswan for our IPSec security.

Warning: openswan is no longer maintained and has been replaced by strongswan. I have not yet tried this with strongswan.

$ apt-get update
$ apt-get install openswan xl2tpd ppp lsof

Configuring xl2tpd

xl2tpd provides our VPN tunnel into our network.

Replace the contents of /etc/xl2tpd/xl2tpd.conf with the following. You may need to make changes based on your network settings and your static IP address we configured previously.

[global]
ipsec saref = yes
listen-addr = 192.168.1.16

[lns default]
ip range = 192.168.1.201-192.168.1.250
local ip = 192.168.1.16
assign ip = yes
require chap = yes
refuse pap = yes
require authentication = yes
name = linkVPN
ppp debug = yes
pppoptfile = /etc/ppp/options.xl2tpd
length bit = yes

Replace your /etc/ppp/options.xl2tpd with the following:

ipcp-accept-local
ipcp-accept-remote
ms-dns 192.168.1.254
asyncmap 0
auth
crtscts
lock
idle 1800
mtu 1200
mru 1200
modem
debug
name l2tpd
proxyarp
lcp-echo-interval 30
lcp-echo-failure 4
nodefaultroute
connect-delay 5000

Configuring IPSec

IPSec is the encryption layer for your VPN tunnel. We are using the openswan implementation.

Replace your /etc/ipsec.conf with the following. Again, you will need to replace any values depending on your network setup.

# /etc/ipsec.conf - Openswan IPsec configuration file

# This file:  /usr/share/doc/openswan/ipsec.conf-sample
#
# Manual:     ipsec.conf.5


version    2.0    # conforms to second version of ipsec.conf specification

# basic configuration
config setup
    # Do not set debug options to debug configuration issues!
    # plutodebug / klipsdebug = "all", "none" or a combation from below:
    # "raw crypt parsing emitting control klips pfkey natt x509 dpd private"
    # eg:
    # plutodebug="control parsing"
    # Again: only enable plutodebug or klipsdebug when asked by a developer
    #
    # enable to get logs per-peer
    # plutoopts="--perpeerlog"
    #
    # Enable core dumps (might require system changes, like ulimit -C)
    # This is required for abrtd to work properly
    # Note: incorrect SElinux policies might prevent pluto writing the core
    dumpdir=/var/run/pluto/
    #
    # NAT-TRAVERSAL support, see README.NAT-Traversal
    nat_traversal=yes
    # exclude networks used on server side by adding %v4:!a.b.c.0/24
    # It seems that T-Mobile in the US and Rogers/Fido in Canada are
    # using 25/8 as "private" address space on their 3G network.
    # This range has not been announced via BGP (at least upto 2010-12-21)
    #virtual_private=%v4:10.0.0.0/8,%v4:192.168.0.0/16,%v4:172.16.0.0/12,%v4:25.0.0.0/8,%v6:fd00::/8,%v6:fe80::/10:
    virtual_private=%v4:192.168.0.0/16,%v4:10.10.0.0/16,%v4:172.16.0.0/12,%v4:25.0.0.0/8,%v4:!10.25.0.0/16
    # OE is now off by default. Uncomment and change to on, to enable.
    oe=off
    # which IPsec stack to use. auto will try netkey, then klips then mast
    protostack=netkey
    # Use this to log to a file, or disable logging on embedded systems (like openwrt)
    #plutostderrlog=/dev/null

# Add connections here

# sample VPN connection
# for more examples, see /etc/ipsec.d/examples/
#conn sample
#        # Left security gateway, subnet behind it, nexthop toward right.
#        left=10.0.0.1
#        leftsubnet=172.16.0.0/24
#        leftnexthop=10.22.33.44
#        # Right security gateway, subnet behind it, nexthop toward left.
#        right=10.12.12.1
#        rightsubnet=192.168.0.0/24
#        rightnexthop=10.101.102.103
#        # To authorize this connection, but not actually start it, 
#        # at startup, uncomment this.
#        #auto=add

conn L2TP-PSK-NAT
    # !mwd - disabling this fixed stuff
    #rightsubnet=vhost:%priv
    also=L2TP-PSK-noNAT

conn L2TP-PSK-noNAT
        authby=secret
        pfs=no
        auto=add
        keyingtries=3
        # we cannot rekey for %any, let client rekey
        rekey=no
        # Apple iOS doesn't send delete notify so we need dead peer detection
        # to detect vanishing clients
        dpddelay=30
        dpdtimeout=120
        dpdaction=clear
        # Set ikelifetime and keylife to same defaults windows has
        ikelifetime=8h
        keylife=1h
        # l2tp-over-ipsec is transport mode
        type=transport
        #
        left=192.168.1.16
        #
        # For updated Windows 2000/XP clients,
        # to support old clients as well, use leftprotoport=17/%any
        leftprotoport=17/1701
        #
        # The remote user.
        #
        right=%any
        # Using the magic port of "%any" means "any one single port". This is
        # a work around required for Apple OSX clients that use a randomly
        # high port.
        rightprotoport=17/%any
        #force all to be nat'ed. because of ios
        forceencaps=yes

# Normally, KLIPS drops all plaintext traffic from IP's it has a crypted
# connection with. With L2TP clients behind NAT, that's not really what
# you want. The connection below allows both l2tp/ipsec and plaintext
# connections from behind the same NAT router.
# The l2tpd use a leftprotoport, so they are more specific and will be used
# first. Then, packets for the host on different ports and protocols (eg ssh)
# will match this passthrough conn.
conn passthrough-for-non-l2tp
        type=passthrough
        left=192.168.1.16
        leftnexthop=192.168.1.254
        right=0.0.0.0
        rightsubnet=0.0.0.0/0
        auto=route

Configuring your Secret Key

The secret key is a shared key that all of your users will use. Edit /etc/ipsec.secrets

# This file holds shared secrets or RSA private keys for inter-Pluto
# authentication.  See ipsec_pluto(8) manpage, and HTML documentation.

# RSA private key for this host, authenticating it to any other host
# which knows the public part.  Suitable public keys, for ipsec.conf, DNS,
# or configuration of other implementations, can be extracted conveniently
# with "ipsec showhostkey".

# this file is managed with debconf and will contain the automatically created RSA keys
#include /var/lib/openswan/ipsec.secrets.inc

192.168.1.16  %any:   PSK "MYSECRET"

Configuring your Users

You can create as many vpn users as you want. These users are separate from any linux user accounts on your Raspberry Pi. Edit /etc/ppp/chap-secrets

# Secrets for authentication using CHAP
# client    server    secret            IP addresses
username    *    password    *

Modifying iptables and System Services

We need to make some changes to the routing table and system configuration. First we will set some values and add them to our /etc/sysctl.conf which will be loaded each time the system starts up:

$ echo "net.ipv4.ip_forward = 1" |  tee -a /etc/sysctl.conf
$ echo "net.ipv4.conf.all.accept_redirects = 0" |  tee -a /etc/sysctl.conf
$ echo "net.ipv4.conf.all.send_redirects = 0" |  tee -a /etc/sysctl.conf

$ sysctl -p

The iptables and /proc settings won’t survive a reboot. We’ll add these commands to the end of our /etc/rc.local to make sure they are executed on start up:

for vpn in /proc/sys/net/ipv4/conf/*; do echo 0 > $vpn/accept_redirects; echo 0 > $vpn/send_redirects; done
iptables --table nat --append POSTROUTING --jump MASQUERADE

Finally, let’s make sure our xl2tpd and ipsec services will be started on boot:

$ update-rc.d -f ipsec remove
$ update-rc.d ipsec defaults

At this point, you should restart your Raspberry Pi to make sure all settings have taken effect and is configured correctly.

Configuring your Router Port Forwarding

This section depends on your router. Most consumer routers/wifi have a web admin interface at either 192.168.1.1 or 192.168.1.254. Once you are logged in, you’ll need to find the port forwarding or NAT/Gaming section. You will need to have the following ports forwarded to your Raspberry Pi IP Address, which in my case is 192.168.1.16. Please be aware that these ports are UDP not TCP.

Port 4500 UDP

Port 500 UDP

Connecting an iPhone

On your iPhone, go to Setting > General > VPN

Choose “Add VPN Configuration”. Select “L2TP” as the Type.

Type: L2TP

Description: Home VPN

Server: Your public IP address (this is NOT your 192.168.1.16 address. You can get this from your router or from http://whatismyip.com)

Account: The username you configured in /etc/ppp/chap-secrets

RSA SecureID: Disabled

Password: The password you configured in /etc/ppp/chap-secrets

Secret: The Shared secret you configured in /etc/ipsec.secrets

Send All Traffic: If enabled, then ALL your internet traffic will be routed through your home network. If you disable this, then normal internet traffic won’t go through your home network. The VPN will only be used to access devices on your home network
Backporting changes with git

Git is an incredibly powerful tool, but often times very obtuse. There are many different types of work flows you can use with git, but one that I use often is having a master branch where all new development happens, and having a maintenance branch, where certain fixes get backported for a new stable release. I have found that if you don’t do things in a certain way, backporting changes can be a very tedious task.

For my work flow, anytime new work is going to begin on a feature or a bug, it is always done in a new feature branch created from master. In my work flow, that branch is always tied to a ticket (that could be a github issue or a jira ticket) that explains the details of the fix. Each branch fixes or adds one and only one thing. Doing this will make backporting specific fixes or features so much easier. Once this feature branch is completed, it is then merged into master. I ALWAYS merge using the –no-commit and –no-ff options. This is for several reasons:

$ git merge --no-commit --no-ff issue-23
  • I always want a single commit that represents the merge of the entire branch. When backporting, I will be able to specifying this single commit and it will bring in all the associated commits with it
  • It keeps my top level git log clean. Running git log –first-parent will only show my merge commits, not every single commit that was ever made.
  • It gives me a chance to update the ChangeLog appropriately and to write a standard commit message, like “Merged Issue 23 – Added new feature blah”

Let’s look at an example. At some point, I decided master was ready for a 1.0.0 release. I tagged this version, and then created a new maintenance branch from master called 1.0.x

$ git checkout -b 1.0.x master

Development will continue on in the master branch, but any critical bug fixes will get back ported from master into the 1.0.x branch, where I will then make new stable releases of 1.0.1, 1.0.2, …

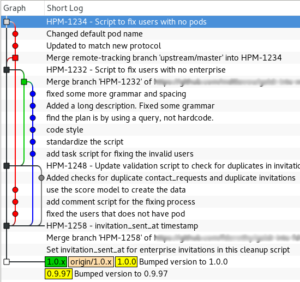
If we take a look at the following log of master, you will see there have been several top level commits into master merging in various feature branches. Each of the commits has lots of subcommits that made up that feature branch.

Master commit log
Master commit log

If we look at the following, the very bottom commit shows where master and the 1.0.x branch diverged. Looking at master, we can see we have 4 merge commits. Each of these branches that were merged in contain subcommits:

  • HPM-1258 – invitation_sent_at timestamp
  • HPM-1248 – Update validation script to check for duplicates in invitations and contact_requests
  • HPM-1232 – Script to fix users with no enterprise
  • HPM-1234 – Script to fix users with no pods

Let’s say that HPM-1234 is the change that we want to merge in. This should bring in every single commit along the red line. This would be very tedious if we had to backport all six individual commits in that branch. That is why we merged in this branch into master using the –no-ff –no-commit options, so we could guarantee to create a single merge commit representing all of them.

Normally, in git, if we wanted to merge in HPM-1234, we would do a git merge 04145ec where 04145ec is the sha1 change. But in git, this will merge every change up to and including HPM-1234. So this will also merge in HPM-1232, HPM-1248, and HPM-1258, which is not what we want!

Git does have a special command for just picking out a single change: cherry-pick. Cherry picking allows us to just pull out a specific commit and merge it into a separate branch. Unfortunately, cherry-pick doesn’t handle scenarios well where a subcommit is a merge. If you look in our example, we can see along our red graph, where master was merged back into our branch. This is going to confuse the cherry-pick command. For the cherry-pick command to work, we will have to manually specific every single commit in the red branch one at a time, instead of just being able to specify the merge commit. And we will either have to skip over the merge commit, or handle it specially using the -m option (depending on what was merged in)

Instead of cherry-pick, we can instead generate a series of patches, then reapply them.  We will do this through the use of two commands: format-patch and am.

There is an issue with doing this. Git loses some of the history, so the relationship of this merge between master and the 1.0.x branch is lost. However, for our case of backporting, this is acceptable.

Each one of the commits in the red graph will come into our maintenance branch as a separate commit. This is not exactly what we want, I would rather have a single top level merge commit in my 1.0.x. Therefore, I will create a new staging branch from the 1.0.x, backport the changes, then merge the staging branch into my 1.0.x branch. Here are the steps:

# create a new staging branch from
# the 1.0.x branch
$ git checkout -b backport-hpm-1234 1.0.x
#
# We will now run format-patch then pipe
# the output directly into am. This will
# create the patches and apply them in a
# single step. We will tell git to just
# use our top level commit
$ git format-patch -n --stdout 04145ec^..04145ec | git am
Applying: fixed the users that does not have a pod
Applying: ...
...

Now we our staging branch looks like the following:

Staging branch with HPM-1234 changes merged in

Now we can go back to our maintenance 1.0.x branch, and merge in our staging branch using the –no-commit and –no-ff options so that we can create a custom merge commit:

$ git checkout 1.0.x
$ git merge --no-commit --no-ff backport-hpm-1234
#
# We can update our ChangeLog or do anything else,
#  then commit
$ git commit -m "Backported HPM-1234 - Script to fix users with no pods"

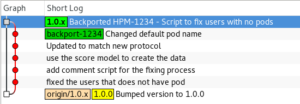
Our 1.0.x tree now looks like:

1.0.x tree with HPM-1234 backported in

You can see we now have a single top level commit in our 1.0.x branch representing the HPM-1234 branch that was backported in.

ELO Touchscreen monitor under Linux

*Edit* I have updated this to no longer require you to edit xorg.conf. This also fixes issues if the touchscreen’s usb cable is hotplugged while X is already running.

I recently purchased an ELO 1537L 15-inch open-frame touchmonitor for a project I am doing at work.  I have successfully gotten the touchscreen monitor to work under linux (specifically Scientific 6.x) using USB (I haven’t tried the serial interface).  Plugging in the monitor, it is recognized as a 5020 Surface Capacitive:


19746:Aug 3 02:51:13 localhost kernel: usb 2-1: Product: Elo TouchSystems Surface Capacitive 5020
19747:Aug 3 02:51:13 localhost kernel: usb 2-1: Manufacturer: Elo TouchSystems
19750:Aug 3 02:51:13 localhost kernel: input: Elo TouchSystems Elo TouchSystems Surface Capacitive 5020 as /devices/pci0000:00/0000:00:1d.0/usb2/2-1/2-1:1.0/input/input7
19751:Aug 3 02:51:13 localhost kernel: generic-usb 0003:04E7:0042.0003: input,hidraw2: USB HID v1.11 Pointer [Elo TouchSystems Elo TouchSystems Surface Capacitive 5020] on usb-0000:00:1d.0-1/input0

ELO provides some generic drivers for this device. I first attempted to directly use them and found them to be a complete disaster. The whole configuration was really silly (putting stuff into /etc/opt, are you kidding me?). The elo daemon constantly hung and had to be restarted. Restarting X caused the daemon to stop working, thus the touchscreen stopped working.

I quickly removed these drivers and tried it with the evtouch drivers which I have used for a USB displaylink touchscreen monitor in the past (MIMO). With a few changes to my xorg.conf, the evtouch driver immediately recognized it and I was able to capture touch events. Although the calibration was initially completely off.

Here’s the steps I took to get this working on Scientific Linux 6.0

Install evtouch

Unfortunately, Scientific Linux does not come with the evtouch driver. I have built a 64-bit rpm for Scientific Linux here . If you need a 32-bit version or for another platform (Fedora), download the src rpm and rebuild it (rpmbuild –rebuild xorg-x11-drv-evtouch-0.8.8-1.el6.src.rpm).

Setup Xorg

It is not required to directly edit xorg.conf. Instead, we will create a hal fdi file

We will create an fdi file in /etc/hal/fdi/policy called elo_touchscreen.fdi

/etc/hal/fdi/policy/elo_touchscreen.fdi

<?xml version="1.0" encoding="ISO-8859-1"?>
<deviceinfo version="0.2">
<device>
<match key="input.product" contains="Elo TouchSystems, Inc. Elo TouchSystems Surface Capacitive 5010">
<merge key="input.x11_driver" type="string">evtouch</merge>
<merge key="input.x11_options.MinX" type="string">3724</merge>
<merge key="input.x11_options.MaxX" type="string">318</merge>
<merge key="input.x11_options.MinY" type="string">3724</merge>
<merge key="input.x11_options.MaxY" type="string">318</merge>
<merge key="input.x11_options.SwapX" type="string">true</merge>
<merge key="input.x11_options.SwapY" type="string">true</merge>
</match>
</device>
</deviceinfo>

If your monitor is slightly different, you will need to get the product id, and replace the match key=”input.product” line in the above file.


$ lshal | grep input.product
input.product = 'Sleep Button' (string)
input.product = 'Power Button' (string)
input.product = 'Macintosh mouse button emulation' (string)
input.product = 'ImExPS/2 Generic Explorer Mouse' (string)
input.product = 'AT Translated Set 2 keyboard' (string)
input.product = 'Elo TouchSystems, Inc. Elo TouchSystems Surface Capacitive 5010' (string)

You should now be able to unplug and plug your touchscreen back in and have it work without restarting X

Calibration

The MinX,MinY,MaxX,MaxY values are used for calibrating the touchscreen. The evtouch source available on their site comes with a calibration utility. However, I was unable to get this to run. For me I played with the MinX, MaxX, MinY, MaxY values in my xorg.conf until it was close enough. As you can see, I had to mirror both the X and Y values.

Other Drivers

I noticed that Scientific Linux also includes an elographics package: xorg-x11-drv-elographics. I have no idea if this works better or not although I have heard they only work with the serial interface. I have it working with evtouch, so I’m happy. If anyone has tried the elographics and had success, please comment!

Genius G-Pen F350 under Ubuntu 9.10 (Karmic)

I purchased a Genius G-Pen F350 for cheap last week.  I am working on translating a book from Chinese, and need to look up characters. The quickest way to do this is to draw the character and use handwriting recognition software such as tegaki. My mousing skills are subpar, so I though a tablet would help.  I picked the Genius for several reasons: it was cheap, it was thin so I can carry it to chinese class, it’s supposed to work under Linux.

Unfortunately, this table does not work out of the box on Ubuntu 9.10 (Karmic).  Plugging it in recognizes it as a mouse which can be controlled with the pen.  Unfortunately, none of the buttons work, and the tablet isn’t relative to the screen (i.e., if you touch the upper left part of the tablet, the mouse should jump to the upper left part of your screen).  After digging around, I have finally been able to get this to work satisfactorally.  Some things are not working, such as the buttons or all the shortcuts, but for my needs, it works well.  Here’s the steps I took:

Install the wizardpen driver

There are two ways to do this:

  1. You can try this precompiled .deb for 32-bit Ubuntu Karmic
    1. Download the following deb: GeniusMousePen
    2. Install the .deb by double clicking on it.
  2. Or you can build the source for yourself
    1. Download the source
    2. Extract it:
      $ tar zxvf wizardpen-0.7.0-alpha2.tar.gz
      $ cd wizardpen-0.7.0-alpha2
    3. Install the necessary development packages:
      $ sudo aptitude install xutils libx11-dev libxext-dev build-essential xautomation xinput xserver-xorg-dev
    4. Compile it:
      $ ./configure --with-xorg-module-dir=/usr/lib/xorg/modules
      $ make
    5. Install it:
      $ sudo make install

Configure the driver

The install should have copied a file called 99-x11-wizardpen.fdi into /etc/hal/fdi/policy/. You will need to edit this file with your favorite text editor and change a few things. For example, in mine, I needed to change the info.product line to WALTOP International Corp. Slim Tablet. I got the name from the output of grep -i name /proc/bus/input/devices:


$ grep -i name /proc/bus/input/devices
N: Name="Lid Switch"
N: Name="Power Button"
N: Name="Sleep Button"
N: Name="Macintosh mouse button emulation"
N: Name="AT Translated Set 2 keyboard"
N: Name="Video Bus"
N: Name="Logitech Optical USB Mouse"
N: Name="DualPoint Stick"
N: Name="AlpsPS/2 ALPS DualPoint TouchPad"
N: Name="Dell WMI hotkeys"
N: Name="HDA Intel Mic at Ext Left Jack"
N: Name="HDA Intel HP Out at Ext Left Jack"
N: Name="WALTOP International Corp. Slim Tablet"

Save this file, then unplug and replug in your tablet. The new settings should be picked up immediately. You will probably also need to change the TopX, TopY, BottomX, and BottomY values. Please see the next section on calibration.

Calibration

Hopefully at this point your tablet is basically working. However, for it to be useful, it needs to be calibrated. You can try to guess on these values or you can use the calibration tool that came in the wizardpen-0.7.0-alpha2.tar.gz package from above (it is not included in the .deb!). Extract the source archive and go into the calibrate folder. There should already be a wizardpen-calibrate executable. If not, run make to build it.

To calibrate your device, run:


$ sudo ./wizardpen-calibrate /dev/input/event6

You may need to replace /dev/input/event6 with the event your tablet is on. You can figure this out by running:


$ ls -l /dev/input/by-id
total 0
lrwxrwxrwx 1 root root 9 2010-01-06 10:56 usb-Logitech_Optical_USB_Mouse-event-mouse -> ../event7
lrwxrwxrwx 1 root root 9 2010-01-06 10:56 usb-Logitech_Optical_USB_Mouse-mouse -> ../mouse2
lrwxrwxrwx 1 root root 9 2010-01-06 11:25 usb-WALTOP_International_Corp._Slim_Tablet-event-if00 -> ../event6

As you can see, my tablet points to event6. Follow the directions of the calibration tool, and it will give you the TopX, TopY, BottomX, and BottomY values you need to replace in your 99-x11-wizardpen.fdi

Changing the sensitivity

The buttons on mine did not work, and it is by default way to sensitive. By changing the pressure, you can specify how hard you must push down before it pushes the left mouse button. This means you can lightly drag the pen and it will just move the mouse. But if you push down harder, it will push and hold the left mouse button down. You can change this by adding the following to your 99-x11-wizardpen.fdi (make sure you add it next to the other lines starting with merge)


<merge key="input.x11_options.TopZ" type="string">512</merge>

Valid values are 0 to 1024. The higher the value, the more you need to push down before the left mouse button activates. I found 512 to be an acceptable value. However, if you are trying to do pressure sensitive drawing, this may not be ideal.

My entire /etc/hal/fdi/policy/99-x11-wizardpen.fdi looks like:


<?xml version="1.0" encoding="ISO-8859-1" ?>
<deviceinfo version="0.2">
<device>
<!-- This MUST match with the name of your tablet -->
<match key="info.product" contains="WALTOP International Corp. Slim Tablet">
<merge key="input.x11_driver" type="string">wizardpen</merge>
<merge key="input.x11_options.SendCoreEvents" type="string">true</merge>
<merge key="input.x11_options.TopZ" type="string">512</merge>
<merge key="input.x11_options.TopX" type="string">573</merge>
<merge key="input.x11_options.TopY" type="string">573</merge>
<merge key="input.x11_options.BottomX" type="string">9941</merge>
<merge key="input.x11_options.BottomY" type="string">5772</merge>
<merge key="input.x11_options.MaxX" type="string">9941</merge>
<merge key="input.x11_options.MaxY" type="string">5772</merge>
</match>
</device>
</deviceinfo>