Backporting changes with git

Git is an incredibly powerful tool, but often times very obtuse. There are many different types of work flows you can use with git, but one that I use often is having a master branch where all new development happens, and having a maintenance branch, where certain fixes get backported for a new stable release. I have found that if you don’t do things in a certain way, backporting changes can be a very tedious task.

For my work flow, anytime new work is going to begin on a feature or a bug, it is always done in a new feature branch created from master. In my work flow, that branch is always tied to a ticket (that could be a github issue or a jira ticket) that explains the details of the fix. Each branch fixes or adds one and only one thing. Doing this will make backporting specific fixes or features so much easier. Once this feature branch is completed, it is then merged into master. I ALWAYS merge using the –no-commit and –no-ff options. This is for several reasons:

$ git merge --no-commit --no-ff issue-23
  • I always want a single commit that represents the merge of the entire branch. When backporting, I will be able to specifying this single commit and it will bring in all the associated commits with it
  • It keeps my top level git log clean. Running git log –first-parent will only show my merge commits, not every single commit that was ever made.
  • It gives me a chance to update the ChangeLog appropriately and to write a standard commit message, like “Merged Issue 23 – Added new feature blah”

Let’s look at an example. At some point, I decided master was ready for a 1.0.0 release. I tagged this version, and then created a new maintenance branch from master called 1.0.x

$ git checkout -b 1.0.x master

Development will continue on in the master branch, but any critical bug fixes will get back ported from master into the 1.0.x branch, where I will then make new stable releases of 1.0.1, 1.0.2, …

If we take a look at the following log of master, you will see there have been several top level commits into master merging in various feature branches. Each of the commits has lots of subcommits that made up that feature branch.
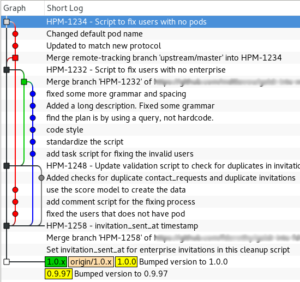
Master commit log
Master commit log

If we look at the following, the very bottom commit shows where master and the 1.0.x branch diverged. Looking at master, we can see we have 4 merge commits. Each of these branches that were merged in contain subcommits:

  • HPM-1258 – invitation_sent_at timestamp
  • HPM-1248 – Update validation script to check for duplicates in invitations and contact_requests
  • HPM-1232 – Script to fix users with no enterprise
  • HPM-1234 – Script to fix users with no pods

Let’s say that HPM-1234 is the change that we want to merge in. This should bring in every single commit along the red line. This would be very tedious if we had to backport all six individual commits in that branch. That is why we merged in this branch into master using the –no-ff –no-commit options, so we could guarantee to create a single merge commit representing all of them.

Normally, in git, if we wanted to merge in HPM-1234, we would do a git merge 04145ec where 04145ec is the sha1 change. But in git, this will merge every change up to and including HPM-1234. So this will also merge in HPM-1232, HPM-1248, and HPM-1258, which is not what we want!

Git does have a special command for just picking out a single change: cherry-pick. Cherry picking allows us to just pull out a specific commit and merge it into a separate branch. Unfortunately, cherry-pick doesn’t handle scenarios well where a subcommit is a merge. If you look in our example, we can see along our red graph, where master was merged back into our branch. This is going to confuse the cherry-pick command. For the cherry-pick command to work, we will have to manually specific every single commit in the red branch one at a time, instead of just being able to specify the merge commit. And we will either have to skip over the merge commit, or handle it specially using the -m option (depending on what was merged in)

Instead of cherry-pick, we can instead generate a series of patches, then reapply them.  We will do this through the use of two commands: format-patch and am.

There is an issue with doing this. Git loses some of the history, so the relationship of this merge between master and the 1.0.x branch is lost. However, for our case of backporting, this is acceptable.

Each one of the commits in the red graph will come into our maintenance branch as a separate commit. This is not exactly what we want, I would rather have a single top level merge commit in my 1.0.x. Therefore, I will create a new staging branch from the 1.0.x, backport the changes, then merge the staging branch into my 1.0.x branch. Here are the steps:

# create a new staging branch from
# the 1.0.x branch
$ git checkout -b backport-hpm-1234 1.0.x
#
# We will now run format-patch then pipe
# the output directly into am. This will
# create the patches and apply them in a
# single step. We will tell git to just
# use our top level commit
$ git format-patch -n --stdout 04145ec^..04145ec | git am
Applying: fixed the users that does not have a pod
Applying: ...
...

Now we our staging branch looks like the following:

Staging branch with HPM-1234 changes merged in

Now we can go back to our maintenance 1.0.x branch, and merge in our staging branch using the –no-commit and –no-ff options so that we can create a custom merge commit:

$ git checkout 1.0.x
$ git merge --no-commit --no-ff backport-hpm-1234
#
# We can update our ChangeLog or do anything else,
#  then commit
$ git commit -m "Backported HPM-1234 - Script to fix users with no pods"

Our 1.0.x tree now looks like:
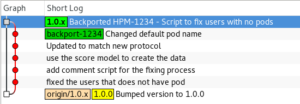
1.0.x tree with HPM-1234 backported in

You can see we now have a single top level commit in our 1.0.x branch representing the HPM-1234 branch that was backported in.

ELO Touchscreen monitor under Linux

*Edit* I have updated this to no longer require you to edit xorg.conf. This also fixes issues if the touchscreen’s usb cable is hotplugged while X is already running.

I recently purchased an ELO 1537L 15-inch open-frame touchmonitor for a project I am doing at work.  I have successfully gotten the touchscreen monitor to work under linux (specifically Scientific 6.x) using USB (I haven’t tried the serial interface).  Plugging in the monitor, it is recognized as a 5020 Surface Capacitive:


19746:Aug 3 02:51:13 localhost kernel: usb 2-1: Product: Elo TouchSystems Surface Capacitive 5020
19747:Aug 3 02:51:13 localhost kernel: usb 2-1: Manufacturer: Elo TouchSystems
19750:Aug 3 02:51:13 localhost kernel: input: Elo TouchSystems Elo TouchSystems Surface Capacitive 5020 as /devices/pci0000:00/0000:00:1d.0/usb2/2-1/2-1:1.0/input/input7
19751:Aug 3 02:51:13 localhost kernel: generic-usb 0003:04E7:0042.0003: input,hidraw2: USB HID v1.11 Pointer [Elo TouchSystems Elo TouchSystems Surface Capacitive 5020] on usb-0000:00:1d.0-1/input0

ELO provides some generic drivers for this device. I first attempted to directly use them and found them to be a complete disaster. The whole configuration was really silly (putting stuff into /etc/opt, are you kidding me?). The elo daemon constantly hung and had to be restarted. Restarting X caused the daemon to stop working, thus the touchscreen stopped working.

I quickly removed these drivers and tried it with the evtouch drivers which I have used for a USB displaylink touchscreen monitor in the past (MIMO). With a few changes to my xorg.conf, the evtouch driver immediately recognized it and I was able to capture touch events. Although the calibration was initially completely off.

Here’s the steps I took to get this working on Scientific Linux 6.0

Install evtouch

Unfortunately, Scientific Linux does not come with the evtouch driver. I have built a 64-bit rpm for Scientific Linux here . If you need a 32-bit version or for another platform (Fedora), download the src rpm and rebuild it (rpmbuild –rebuild xorg-x11-drv-evtouch-0.8.8-1.el6.src.rpm).

Setup Xorg

It is not required to directly edit xorg.conf. Instead, we will create a hal fdi file

We will create an fdi file in /etc/hal/fdi/policy called elo_touchscreen.fdi

/etc/hal/fdi/policy/elo_touchscreen.fdi

<?xml version="1.0" encoding="ISO-8859-1"?>
<deviceinfo version="0.2">
<device>
<match key="input.product" contains="Elo TouchSystems, Inc. Elo TouchSystems Surface Capacitive 5010">
<merge key="input.x11_driver" type="string">evtouch</merge>
<merge key="input.x11_options.MinX" type="string">3724</merge>
<merge key="input.x11_options.MaxX" type="string">318</merge>
<merge key="input.x11_options.MinY" type="string">3724</merge>
<merge key="input.x11_options.MaxY" type="string">318</merge>
<merge key="input.x11_options.SwapX" type="string">true</merge>
<merge key="input.x11_options.SwapY" type="string">true</merge>
</match>
</device>
</deviceinfo>

If your monitor is slightly different, you will need to get the product id, and replace the match key=”input.product” line in the above file.


$ lshal | grep input.product
input.product = 'Sleep Button' (string)
input.product = 'Power Button' (string)
input.product = 'Macintosh mouse button emulation' (string)
input.product = 'ImExPS/2 Generic Explorer Mouse' (string)
input.product = 'AT Translated Set 2 keyboard' (string)
input.product = 'Elo TouchSystems, Inc. Elo TouchSystems Surface Capacitive 5010' (string)

You should now be able to unplug and plug your touchscreen back in and have it work without restarting X

Calibration

The MinX,MinY,MaxX,MaxY values are used for calibrating the touchscreen. The evtouch source available on their site comes with a calibration utility. However, I was unable to get this to run. For me I played with the MinX, MaxX, MinY, MaxY values in my xorg.conf until it was close enough. As you can see, I had to mirror both the X and Y values.

Other Drivers

I noticed that Scientific Linux also includes an elographics package: xorg-x11-drv-elographics. I have no idea if this works better or not although I have heard they only work with the serial interface. I have it working with evtouch, so I’m happy. If anyone has tried the elographics and had success, please comment!

Gnome Shell Extension: Search Window

The Gnome desktop recently release version 3 of their desktop, which includes their all new Gnome Shell. I have been using it for several months now, and I must say I really like the direction it is going. It is still early and is missing a lot of little things, but those will come soon. We are starting to see new extensions being built for it to extend the functionality.

One feature I have found blatantly missing is the ability to search active windows in the overview. In overview mode, you first see a live preview of all your windows. But if you’re like me, you have 15 terminals and 10 web browser windows up (I despise tabs!). Typing starts a search, which by default searches: your installed applications to quickly start one, files, and places. Search is completely missing the ability to search through open windows based on their title!

I quickly wrote my first gnome-shell extension to do just that. It is still an early version, and I would like to update it to add more features such as showing a live window preview instead of just the application icon.

Initial Overview Display
Initial Search for "fed" with results being narrowed down. Two open terminals and three open web browsers have titles that match
Search for "fed wiki" showing an open browser on the Fedora Wiki

Try it out, and send me your thoughts:

gnome-shell-extensions-window-search-0.0.1

You can use the gnome-tweak-tool to install it, or extract it into

$HOME/.local/share/gnome-shell/extensions

Genius G-Pen F350 under Ubuntu 9.10 (Karmic)

I purchased a Genius G-Pen F350 for cheap last week.  I am working on translating a book from Chinese, and need to look up characters. The quickest way to do this is to draw the character and use handwriting recognition software such as tegaki. My mousing skills are subpar, so I though a tablet would help.  I picked the Genius for several reasons: it was cheap, it was thin so I can carry it to chinese class, it’s supposed to work under Linux.

Unfortunately, this table does not work out of the box on Ubuntu 9.10 (Karmic).  Plugging it in recognizes it as a mouse which can be controlled with the pen.  Unfortunately, none of the buttons work, and the tablet isn’t relative to the screen (i.e., if you touch the upper left part of the tablet, the mouse should jump to the upper left part of your screen).  After digging around, I have finally been able to get this to work satisfactorally.  Some things are not working, such as the buttons or all the shortcuts, but for my needs, it works well.  Here’s the steps I took:

Install the wizardpen driver

There are two ways to do this:

  1. You can try this precompiled .deb for 32-bit Ubuntu Karmic
    1. Download the following deb: GeniusMousePen
    2. Install the .deb by double clicking on it.
  2. Or you can build the source for yourself
    1. Download the source
    2. Extract it:
      $ tar zxvf wizardpen-0.7.0-alpha2.tar.gz
      $ cd wizardpen-0.7.0-alpha2
    3. Install the necessary development packages:
      $ sudo aptitude install xutils libx11-dev libxext-dev build-essential xautomation xinput xserver-xorg-dev
    4. Compile it:
      $ ./configure --with-xorg-module-dir=/usr/lib/xorg/modules
      $ make
    5. Install it:
      $ sudo make install

Configure the driver

The install should have copied a file called 99-x11-wizardpen.fdi into /etc/hal/fdi/policy/. You will need to edit this file with your favorite text editor and change a few things. For example, in mine, I needed to change the info.product line to WALTOP International Corp. Slim Tablet. I got the name from the output of grep -i name /proc/bus/input/devices:


$ grep -i name /proc/bus/input/devices
N: Name="Lid Switch"
N: Name="Power Button"
N: Name="Sleep Button"
N: Name="Macintosh mouse button emulation"
N: Name="AT Translated Set 2 keyboard"
N: Name="Video Bus"
N: Name="Logitech Optical USB Mouse"
N: Name="DualPoint Stick"
N: Name="AlpsPS/2 ALPS DualPoint TouchPad"
N: Name="Dell WMI hotkeys"
N: Name="HDA Intel Mic at Ext Left Jack"
N: Name="HDA Intel HP Out at Ext Left Jack"
N: Name="WALTOP International Corp. Slim Tablet"

Save this file, then unplug and replug in your tablet. The new settings should be picked up immediately. You will probably also need to change the TopX, TopY, BottomX, and BottomY values. Please see the next section on calibration.

Calibration

Hopefully at this point your tablet is basically working. However, for it to be useful, it needs to be calibrated. You can try to guess on these values or you can use the calibration tool that came in the wizardpen-0.7.0-alpha2.tar.gz package from above (it is not included in the .deb!). Extract the source archive and go into the calibrate folder. There should already be a wizardpen-calibrate executable. If not, run make to build it.

To calibrate your device, run:


$ sudo ./wizardpen-calibrate /dev/input/event6

You may need to replace /dev/input/event6 with the event your tablet is on. You can figure this out by running:


$ ls -l /dev/input/by-id
total 0
lrwxrwxrwx 1 root root 9 2010-01-06 10:56 usb-Logitech_Optical_USB_Mouse-event-mouse -> ../event7
lrwxrwxrwx 1 root root 9 2010-01-06 10:56 usb-Logitech_Optical_USB_Mouse-mouse -> ../mouse2
lrwxrwxrwx 1 root root 9 2010-01-06 11:25 usb-WALTOP_International_Corp._Slim_Tablet-event-if00 -> ../event6

As you can see, my tablet points to event6. Follow the directions of the calibration tool, and it will give you the TopX, TopY, BottomX, and BottomY values you need to replace in your 99-x11-wizardpen.fdi

Changing the sensitivity

The buttons on mine did not work, and it is by default way to sensitive. By changing the pressure, you can specify how hard you must push down before it pushes the left mouse button. This means you can lightly drag the pen and it will just move the mouse. But if you push down harder, it will push and hold the left mouse button down. You can change this by adding the following to your 99-x11-wizardpen.fdi (make sure you add it next to the other lines starting with merge)


<merge key="input.x11_options.TopZ" type="string">512</merge>

Valid values are 0 to 1024. The higher the value, the more you need to push down before the left mouse button activates. I found 512 to be an acceptable value. However, if you are trying to do pressure sensitive drawing, this may not be ideal.

My entire /etc/hal/fdi/policy/99-x11-wizardpen.fdi looks like:


<?xml version="1.0" encoding="ISO-8859-1" ?>
<deviceinfo version="0.2">
<device>
<!-- This MUST match with the name of your tablet -->
<match key="info.product" contains="WALTOP International Corp. Slim Tablet">
<merge key="input.x11_driver" type="string">wizardpen</merge>
<merge key="input.x11_options.SendCoreEvents" type="string">true</merge>
<merge key="input.x11_options.TopZ" type="string">512</merge>
<merge key="input.x11_options.TopX" type="string">573</merge>
<merge key="input.x11_options.TopY" type="string">573</merge>
<merge key="input.x11_options.BottomX" type="string">9941</merge>
<merge key="input.x11_options.BottomY" type="string">5772</merge>
<merge key="input.x11_options.MaxX" type="string">9941</merge>
<merge key="input.x11_options.MaxY" type="string">5772</merge>
</match>
</device>
</deviceinfo>

Build Systems

Automake and I have been friends for a long time.  We’ve loved, we’ve laughed, we’ve cried … A lot!  Automake is the de facto build system on unix (especially linux) systems.  I use it in almost all my projects.  Automake isn’t too hard once you stop copying someone else’s Makefile.am’s and configure.ac’s and actually take a few minutes to learn what’s going on.  Although lack of documentation and that horrible language called m4 is a huge turn off.  Although I really like the way automake feels, I’ve felt that it needs to be modernized with a simpler syntax, more cohesive tools, and a decent scripting language.  This and the fact that it doesn’t play nicely under windows (unless you want to build with gcc in cygwin or cross-compile), has left me looking for something new.

2 years ago when I changed direction and started working on different projects, our regular windows builds ceased.  I somehow had become the official builder + releaser guy in our lab.  Every once in a while we’d need to get a new development build out for a windows user.  I’d have to step in, remember how everything worked, fight the system, and eventually come up with a build.

A long time ago, I had everything cross compiling in a chroot environment.  This was nice since I had a shell script which would do everything for me, except the final freezing of python which had to be done in windows.  Over the years the dependencies in the chroot environment became out of date, and things stopped building.  I was busy and never updated the machine, and eventually it was re-purposed for something else.

Then came the windows vmware image with mingw setup (we didn’t need to depend on cygwin for any posix stuff).  This was okay, but more difficult to script, and became a much more manual process which also became a constant update headache.

Recently we wanted to stop building under gcc and move to using visual studio’s compiler.  The build system had stopped working and we were running into issues when creating our python modules.  Automake + libtool would not play nicely with Visual Studio’s compiler, so I started looking at alternatives.

  • CMake: The only experience I have with it is building vtk, and it just pisses me off … out
  • BJam: Interesting.  Doesn’t have a configure stage but can use autoconf … intersesting, but didn’t see much of a payoff
  • SCons:  Seems to have gained the most popularity and works well under windows + unix

After some initial testing, I decided to move our projects over to SCons.  SCons has made some things very easy, like building with Visual Studio’s compiler and handling SWIG.  However, SCons is contantly doing things to annoy me.  Here’s my list of personal annoyances:

  • Make it feel more unixy.  Everything about SCons feels foreign
  • By default everything should have an install and uninstall target.  None of the alias stuff, and I still don’t have uninstall going
  • Something to handle .in files.  We use these all over the place for creating run scripts, pkg-config files, etc..  Automake will automatically read a .in file, replace everything surrounded with @ and write the the new file
  • SCons config.h support is terrible.  Hell, I couldn’t even get it to actually write the config.h file until a create a default target depending on config.h
  • Running configure is essential.  We build our software on all different OSes with very different configurations.  We must be able to find what packages are available and where they.  If not available, we need to error out or build around it.  SCons has some configure support, but it’s severely lacking.  I also hate the fact that the configure step runs every time you build.  It should be run once and then automatically if a dependency check has changed.  I managed to sort of get around this by creating a dummy configure target that automatically runs the first time, and then dumps off the settings.  Don’t get me started on SCons’s crappy Variable support.
  • Better support for pkg-config.  Both using pkgconfig to find packages and support for creating .pc files
  • SCons by default doesn’t use your environment.  I understand that they want a clean environment, but this means override CXX with ccache is ignored.  This also means that programs in your extended PATH are ignored.  Even things like overriding the PKG_CONFIG_PATH to find pkgconfig files is ignored.  Annoying!
  • Lots of minor things i’m not going to get into

There are plenty of good things about SCons.  I really like working in python, and it’s nice that it works well in windows and unix.  Overall, SCons is mostly working for us, but I am in no way satisfied with it.  I suppose someday I’ll have to write my own build system.

Physics Libraries

I’ve been adding in some fun physics demos for our viscube.  In the past I’ve always used ODE, since it was the only decent open source physics engine. It looks like some new ones have come out that have some great potential.  I hope to try them out over the next few weeks and review them:

  • Bullet – This was created by an ex-Havok employee

Then there are these two which are for generic modeling and simulation.  Both look really neat and useful.

CAVE^H^H^H^H Viscube Installed

Our CAVE, err, Viscube (we aren’t supposed to use the ‘C’ word around here) was installed last week.  This is a 4-wall immersive environment developed by our friends at Visbox.  The installation happened just in time for our important Advisory Council meeting which gave me a whole day and a half to get the machine setup with working demos.  No stress there! I need a vacation!

Cave environments are nothing new, nor are any of us in ETLab strangers to them. There are several nice things about our Viscube that weren’t available in older Caves:

  • Passive Stereo: I hate, hate, hate, I mean HATE active stereo shutter glasses.  I don’t care what rate they sync at, they make me nauseous in minutes.   Passive glasses I can stare through all day.  Even better, we are not using polarization, but instead using glasses from Infitech which are quick slick (although expensive. ~$250/glasses)
  • Single machine setup: That’s right, an 8-core machine with 16 gigs of RAM and 4 Quadro FX 4700, each with dual output.  This let’s us power 4 screens (front, left, right, and floor) with a single machine.  This certainly makes programming easier as we don’t have to worry about shared memory or communication between machines.  Everything could be run in a single thread, although we may as well take advantage of our 8 cores.

I’m excited to finally have a cave environment here.  We have several stereo single wall displays, but you don’t get the immersion out of those that you can get in a cave setup.  It’ll be fun to play with, and I have a few ideas for some projects I want to develop on it.

Virtual Reality…Simulated Reality.. VR.  We’ve been talking about this for decades, and where are we now?  Where’s my holodeck?  Where’s my virtual vacation? If you ask me, Virtual Reality is not the future.  We (the computer graphics industry) have been talking about VR for decades.  Has anything improved?  Our pictures are a lot prettier than they used to be, but haptics devices are still mostly useless (except for a very few specific uses), mobility is limited in a cave environment, and caves only work for a single viewer.  It’s still impossible to simulate the entire environment in the computer, and there’s no ability to have real, physical objects in the cave. So what then?  If we can’t do VR, what’s next?

AR – Augmented Reality is where it’s at.  We’ve started to see simple AR applications.  We see them every time we watch a football game, or here in Alabama, NASCAR, we’ve even seen them on the iphone.  AR consists of mixing virtual into the real.  In the NFL the yellow first down line drawn across the field is a great example of AR.  But we are still in infancy, and until we get better at image processing (which will happen soon!), AR is limited in its applications.  This is where my research interests really lie, and I’m exciting about being part of of this emerging field.  I’ll have lots of posts in the future about my AR research.  For now you can see a simple example of AR, and another project where we are using it practially.

New Blog

Welcome.  I’ve decided it’s time to start a blog solely dedicated to my work and/or subjects that relate to my work.  Hopefully this will stay up to date, and I’ll actually do something at work worth writing about ;-p